So you want to know how to edit skate videos, eh? Well, I’m not going to lie, it’s not easy, and it will take practice and time. But, in this article I’ll go over some editing programs, tips, and other helpful tips to get you one step closer to Ty Evans-esque montages.
We’ll start with some of the most popular editing programs, and their pros and cons.
–
–
–
Sony Vegas

Vegas is a thorough video and audio editor. The layout is complicated, so be prepared to click around a lot to see how everything is done, and look at some walkthroughs on youtube as well. Most think Vegas is a lower end editing program and you can’t do as much with it as such others as Adobe Premiere, but this is wrong. Vegas has tons of features for both audio and video editing, and is very useful. Sony Vegas also sports very good color correction settings, which can greatly improve the quality of your montage. In short, if you can get around the tricky interface and take the time to learn everything about Vegas, it is a very good program. If you don’t, then Vegas is no more helpful than Windows Movie Maker.
–
–
–

Premiere is arguably the most popular editing program. It boasts many features, good color correction, and a more simple layout. It is much easier to learn than Vegas, and can do pretty much everything Vegas can. While Sony Vegas excels more in color correction and video fx options, Adobe Premiere is an extremely simple interface to use, and still has many features. Another down side is that Premiere is a much larger file and will run slower, and possibly freeze or preview videos badly. Also, Premiere is much more expensive than Sony Vegas.
–
–
–
Final Cut Pro
In short, this is arguably the best editing program you can get. Downside: it’s only for Mac. If you have a Mac, get this program now. It has an easy to use layout, great color correction and video fx options, many features, and the amazing ramped slow-mo feature, which neither of the above have. Hands down the best editing program right now.
–
–
–
Editing the video
Here comes the dirty work. First, you need a song. If you have one in mind, great. If you don’t, time to search. I find the best ways of searching are using Pandora or finding music you like on youtube, then clicking the related videos and listening to them. When you find your song, be sure to use http://www.skatevideosite.com/songsearch to make sure it hasn’t been used, because re using songs is a big no-no. Now, make sure all the clips you want to use are imported. It’s best to have all the clips for the montage before you start, instead of progressively adding new clips as you film them. This way, it ensures the best tricks are towards the end, and every trick or line is where you want it to be. Also, pick a song that goes well with skating. The song choice will make or break your video. Don’t put you guys skating to your favorite song without even trimming the clips. That’s not real editing. You want the music to be in sync with the skating. As someone lands a trick, the drum kicks or the bass hits. Clips switching on a loud bass or drum kick work well also. And make sure to use transitions between clips, but not always. Maybe a 50/50 between transitioned clips and non transitioned clips. It’s hard to explain this part of editing, you just need to use the song to your creative advantage. Make sure there’s a good mix between longlens and fisheye shots, and just try new things. This is the part that takes the most practice, because it’s not something you can simply explain and have down, you need to learn how you like to edit and try new things.
–
–
–
Color Correction
Good color correction is one of the best things you can do to make a video better. This also takes a bit to fully understand, but here are the basics to it. Open up 3-way color corrector(if using Premiere or Final Cut) or Color Corrector Primary-Computer RGB to studio RGB(if using Vegas). You will get 3 color wheels, with dots in the middle, a saturation bar, and 3 others that you don’t need to touch or know. The low tones wheel you can leave alone most of the time. The midtones wheel is the one you’ll be using primarily. Moving it towards red will give your clip warmer colors, while moving it towards blue gives cooler colors. Purple and green will very rarely be used, mostly when your white balance is way off or there is weird fluorescent lighting. However, adding warmth or coolness can improve almost any clip. The high tones wheel will pretty much only effect the sky. For saturation, most 3 chip cameras will need no or minimal boosting. But cheaper cameras or 1 chip cameras will almost always need a saturation boost, so be sure to do that. The other important color correcting tool you can use is color curves. Color curves opens up what looks like a diagnol line across a white plane. What you want to do is make a slight “S” out of the diagnol line by clicking and dragging on the square points. This adds contrast, which most clips will need, but some more than others. Don’t over do it on this either, because too much contrast looks terrible. Just make a very small “S” and keep playing around until your clip looks good.
–
–
–
Exporting
Finally, your video is done! Only one thing left to do: render and export. You’re going to need a seconary compressing program for this, because all of the editing programs won’t have great compressing options. So, in your primary editing program, render/export as a raw .avi file. This will ensure you lose no quality and won’t end up compressing twice. Once it finishes, you need your compressing program. MPEG streamclip is a great free one available for download, and the most popular would be Sorenson Squeeze, which will cost you, but has the best compressing options available. Whichever you choose, import your raw .avi file into the program.
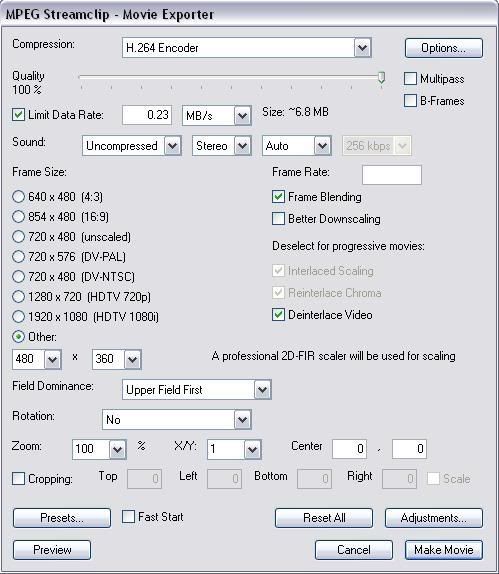 (From Skateperception) These are some good settings for MPEG Streamclip that you can use. If you have Sorenson, here is the link to download the infamous “Super Settings”, arguably the best compression settings you can get.
–
–
–
These are just some tips on how to make a better video. More in depth reviews and tutorials will be done in the future, so for now hopefully you learned some new tricks to editing, and good luck!